Saturday 8 August 2015

EducampBOP 2015


Today we reignited the Educamps at this end of the Bay Of Plenty. We had approximately 35 attendees who made the most of the opportunity to gain some wonderful PD from the fellow attendees who shared their experience and findings.

EducampBOP2015 Wiki Page

What makes this type of PD so special, it that it is self directed. We hear from our fellow delegates, then we choose what we want to hear more of. We break into small groups and get the opportunity to ask questions and seek clarification. More importantly we make connections with like minded educators who are at the "chalk face". They have made been on a journey and continue to be life long learners themselves.

Do not be turned off by feeling you should be contributing, this is purely voluntary, but if you would like to contribute, it is as easy as creating content on the slide show (smackdown) and a 2 minute (at the most) presentation.

This is my second Educamp and I have taken something new away from each one. These are held nationwide at various times of the year, so attending more than once a year is possible.

I would encourage anyone to find an event near you and attend. It is motivating, inspiring and engergising. EducampBOP will be on again next year at around the same time.

This is the smackdown of the information shared at today's Educamp.


We connected through Twitter as well. This is a Storify of the day.


Sunday 19 July 2015

Creating an Inclusive Classroom


Recently I spoke at a #TeachMeetNZ session about inclusive classroom practise. You will find a  copy of the slide presentation on my page on the TeachMeetNZ wiki.

Click to view the presentation


It is an amazing experience to be part of a TeachMeet session as a presenter. It is a supportive environment where you get to share/celebrate your successes and you get to connect with excellent teachers who are making a difference for their students everyday. Sonya is very good at making you feel at ease. I highly recommend you watch all the presenters as they all had different topics and all equally inspiring.

If you are interested in participating in a TeachMeetNZ, they have a wiki with details about what type of PD this is and how you can participate as part of the audience during the TeachMeetNZ sessions (look under #TeachMeetNZ on Twitter for up and coming events) or if you wish to become a presenter you could contact Sonya. 

Sonya Van Schaijik (Twitter: @vanschaijik) Google+ Sonya Van Schaijik__) is the creator of TeachMeetNZ, and would be happy to answer any further queries you may have.

A question a lot of people new to using social media as a personal learning network (PLN) ask, "How do I know who to start following?" Start to follow educators that are involved in these type of events such as #TeachMeetNZ  and Educamps and this will give you an excellent start.


Monday 13 July 2015

Create a Google Form

I have asked the students to create a Google Form to conduct a survey about "Pets". Here is a step by step guide to creating a simple survey.

1. Go to the Google Drive and select Google Forms.


2. Give your form a title and describe the purpose of your survey (if desired)


3. Start writing your questions. 


There is a variety of answering options to choose from depending on the information you are wanting.

4. Once you have completed your questions, you are able to personalise your survey.


You are able to change the options above, including using images from our computer

5. You can now view the live form and get the link so people can participate in the survey. 

First you can embed the survey into a blog or website.


Or you can use a website to create a QR Code and/or a shortened URL (I have a Chrome Extention to create these). 


6. There will be two files in your Google Drive, the form/survey and the response spreadsheet which collates the responses automatically. 


All done - Have fun. There are many uses for Google Forms any time you wish to collate information or any sort.


Wednesday 8 July 2015

Guided Access

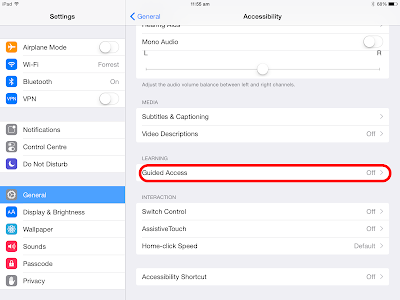
Some students need some help to focus on the job at hand. On the  iPad, there is a lovely tool called Guided Access. This deactivates the Home Button so the student can't just pop out of the app. It is quick and easy to activate.

Go to Settings, then General and select Guided Access


If the student triple clicks the home button, where it says "Start" now, it will say "Resume" so you can carry on if needed.


Assistive Technology for Reading and Writing on Apple devices

To enable students to gain access to information, some need a little help to read and write. The iPad has a selection of tools to help make accessing information more of a level playing field.

Text to Speech

By highlighting text, the student has the option to have the text read to them and the words highlighted as it goes.  Very good for children to check that what they have written sounds like "book language". Can help a student hear their story so far and expand on their writing. Gives students access to information on the web that may be difficult for them to read, but they can understand when it is read to them. It is important the check the speed at which the text is being read to them, so they are given a chance to hear and process the information.

iOS Devices


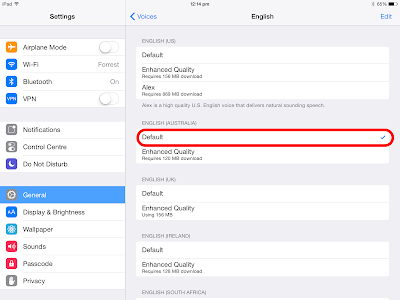
First go to Settings, then General and then Accessibility


Select Speech


You are now ready to use this in web browsers, documents and anywhere else you are able to highlight text.


OSX Devices


Go to System Preferences and select Dictation and Speech


Speech to Text

By activating Siri, you are able to speak into the microphone and dictate text which is then typewritten for you. This can be used in the iWorks Suite of apps, some third party apps and web browsers. Sometimes the use of a set of earphones with a microphone (like the ones used for an iPhone) may improve accuracy.

iOS Devices


Go to Settings, then General and then Siri

Enable Siri, Choose a Language and Voice Gender

It has the New Zealand option now. Siri improves voice recognition the more you use it.


This will come up the first time you use Siri to dictate a search in a web browser in iOS


OSX Devices


Again, go through Systems Preferences

There are many other assistive options for Apple devices to assist with vision, hearing and physical and motor skills and learning.


Monday 6 July 2015

A Web Whiteboard

Click here for more information


I have found this to be a very useful web tool which is not platform dependent.

This online whiteboard is another alternative to creating an "Explain Everything" experience on the laptop/desktops.

You are able to share a link from a whiteboard you are working on, to invite others to collaborate using their own devices simultaneously.


You can bring in JPEG files and annotate over the top of this to explain a concept such as part/whole addition.


You are then able to either download the finished image.


or 


Use Quicktime,  to make a screen recording of the explanation which will also record the oral explanation. Be sure, if you are using images to help with the explanation, to have all necessary images pre-downloaded before you start the screen recording. 


Select the work area of the Web Whiteboard and your screen recording will start.

When you have finished you press, ⌘,⌃, esc (command, control, escape) and this will stop the recording and bring up the finished recording ready to be given a file name and saved.

These explanations can be filed in the student's Google Drive. From there, the students can share these if the movie is needed to make a collaborative presentation.


Friday 29 May 2015

Using Puffin on iPads - drag and drop

As we are all well aware, iPads do not support sites that use flash. To fix this you can use the browser Puffin on the iPads.  There is a lite version to trial and the paid version at present is $4.99 (NZD).

It provides Adobe Flash support over the cloud.

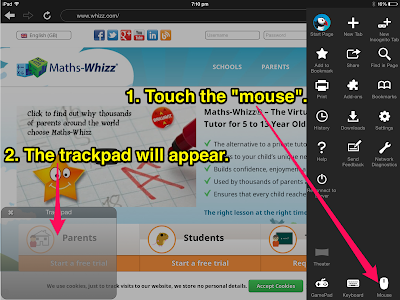
In the main it works nicely, but if you wish to drag and drop or move objects in a "game", you will need to do the following:


Friday 8 May 2015

Desktop Alternative to iPad Apps


When you are operating a classroom environment with mixed devices, one of the concerns I have heard is, "How can we work with our students using a mixture of devices and have the same types of software available for our students to work on?"

To address some of these concerns I have compiled a short list of resources from the web that can be run along side some of the creative apps on the iPad (iOS). Together with some of the software available on the desktop/laptop (OSX), such as the iLife suite, Kidpix, Comic Life and some you can find on the App store, you can work with comparable software.

For example, if you would like your students to make a pictorial representation of their learning in an app such as Pic Collage, on the desktop (Apple) we use Pages. With the instant alpha feature, text boxes and the ability to use shapes to create colourful backgrounds,  it's a very good alternative. Saved as a PDF, it can then be stored easily in their google drive or changed into a JPG via Preview if needed.

This link is to our digital resources in the Pūkeko Whānau resources site.

The sites that use flash such as Studyladder and Math Whizz will require a browser app on the iPad that enables them to operate with any success.

So far I have found that the "flash" experience on the iPad is not as smooth as when you use a desktop or a laptop to access the site, but it does in the main, work.

So far we have found that each device has its strengths. At times, it can be useful to start a project on one type of device and then put the finishing touches on with another. Saving your files as movies or jpegs helps the user to move files seamlessly between devices and applications.  This can be used to our best advantage when the students are collaborating on a project and they are able to complete elements of their presentation on the "best suited" device and then collate the project using one of the publishing apps on either one of OS.


Wednesday 29 April 2015

App Smashing - Show what we know


In Year 4 we are having a great time being able demonstrate our understandings with more than just pen and paper. We are also collaborating to publish our findings.

Using our information gathers (camera, safari, QR reader), we apply the information using a variety of oral presenters (e.g. Tellagami, Chatterpix, Explain Everything, Shadow Puppet, Puppet Pals) and visual presenters (Strip Designer, Skitch, Pic Collage, Word Cloud, Type Drawing) to make a collaborative project using the publishers (iMovie, Book Creator, Keynote). Anything you can send to the Camera Roll can be used in the project.


Working Together (iLive and iLearn)

 In groups of 3 or 4 (iBelong), the students gather their information and outline what they are wanting to include in their final presentation (iThink). To start with this can be done in collaboration with the teacher. Later, they can be given a brief (including a rubric as well to self access). They then divide the information up into sub presentations (storyboard) and assign who will prepare the information using which app. Each group member works on their "part" (iCreate). They may even work on some parts together such as Puppet Pals. The students then collaborate their efforts onto one device using one of the publishers. Final touches such as titles, credits, music and any final narration is done together. A presentation afternoon would be a very powerful motivational tool for the students.

The biggest challenge for the students (iCommunicate) is to make sure all the group members are clear about what they are doing towards the project (iSelf Manage), fast workers help others who need more support (iSupport). They also need to make sure the project will flow and they make it interesting.


The History of the Anzac Biscuits 


Tuesday 21 April 2015

Explain our Learning Desktop Style

Explain Everything has been a very popular app on the iPad due to its versatility including giving the learner the ability to explain their understandings both orally and using drawing or annotation.

So, the challenge for classes where we have a mixture of devices is how we are able to simulate a similar experience for our learners on the desktops or laptops.

We could use Photo Booth, but finished product is in mirror image and any writing or symbols are reversed.


A better solution is to use iMovie:

1.  Open iMovie, File ➜ New Event ➜ Name the event
2. To open the camera File ➜ Import Media. This will open the FaceTime Camera
3. Click on red button to start and then click on the same button to stop. Close the window and the clip will be in the event.
4. Create a new movie (plus button on the top bar labelled "New").
5. Import the event into the movie project.
6. Share the project as a new file on the desktop.

You can try to angle the camera on the laptop to film over the students shoulder as they write on a whiteboard, a scrapbook or use equipments to explain their learning.
When using a desktop, use a portable whiteboard to write on while explaining their learning. They could use props such as books, photos, conduct interviews or create a demonstration.

I have created prompt sheets for the students to use while creating their recordings for both iMovie 8 or 9 and for iMovie 10.

Click here to see an example using iMovie to record and explanation of learning


OR


Using Quicktime to screen record while using Kidpix to draw and/or annotate.

Open Kidpix

You can import an image if you wish to annotate a photo, a picture or turn a pdf into a jpeg (through Preview) to annotate a document.

Get it all set up and ready to go, then hide it (place it in the dock)


You are able to create a template if you would like your class to explain the same strategy (maths) or subject.


Then open Quicktime:


Once you have clicked on the "Record" button you will see this message.


Click on Kidpix in the dock and you can start your explanation straight away.
When you have finished, press ⌘, ⌃, ␛ (command, control, escape) and this will stop the recording and bring up the finished recording ready for you to give the file a name and save it.

Click here to see an example of using Qucktime and Kidpix to record the student's learning


These files can be then uploaded into Google Docs, inserted into Keynote, Book Creator, iBook Author or any other applications that can use .mov or .mp4 files.