Sunday 19 July 2015

Creating an Inclusive Classroom


Recently I spoke at a #TeachMeetNZ session about inclusive classroom practise. You will find a  copy of the slide presentation on my page on the TeachMeetNZ wiki.

Click to view the presentation


It is an amazing experience to be part of a TeachMeet session as a presenter. It is a supportive environment where you get to share/celebrate your successes and you get to connect with excellent teachers who are making a difference for their students everyday. Sonya is very good at making you feel at ease. I highly recommend you watch all the presenters as they all had different topics and all equally inspiring.

If you are interested in participating in a TeachMeetNZ, they have a wiki with details about what type of PD this is and how you can participate as part of the audience during the TeachMeetNZ sessions (look under #TeachMeetNZ on Twitter for up and coming events) or if you wish to become a presenter you could contact Sonya. 

Sonya Van Schaijik (Twitter: @vanschaijik) Google+ Sonya Van Schaijik__) is the creator of TeachMeetNZ, and would be happy to answer any further queries you may have.

A question a lot of people new to using social media as a personal learning network (PLN) ask, "How do I know who to start following?" Start to follow educators that are involved in these type of events such as #TeachMeetNZ  and Educamps and this will give you an excellent start.


Monday 13 July 2015

Create a Google Form

I have asked the students to create a Google Form to conduct a survey about "Pets". Here is a step by step guide to creating a simple survey.

1. Go to the Google Drive and select Google Forms.


2. Give your form a title and describe the purpose of your survey (if desired)


3. Start writing your questions. 


There is a variety of answering options to choose from depending on the information you are wanting.

4. Once you have completed your questions, you are able to personalise your survey.


You are able to change the options above, including using images from our computer

5. You can now view the live form and get the link so people can participate in the survey. 

First you can embed the survey into a blog or website.


Or you can use a website to create a QR Code and/or a shortened URL (I have a Chrome Extention to create these). 


6. There will be two files in your Google Drive, the form/survey and the response spreadsheet which collates the responses automatically. 


All done - Have fun. There are many uses for Google Forms any time you wish to collate information or any sort.


Wednesday 8 July 2015

Guided Access

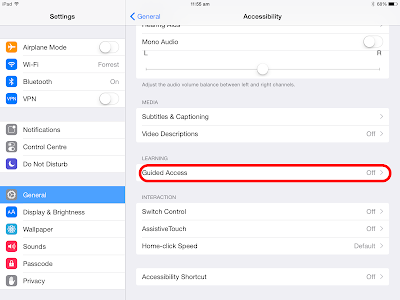
Some students need some help to focus on the job at hand. On the  iPad, there is a lovely tool called Guided Access. This deactivates the Home Button so the student can't just pop out of the app. It is quick and easy to activate.

Go to Settings, then General and select Guided Access


If the student triple clicks the home button, where it says "Start" now, it will say "Resume" so you can carry on if needed.


Assistive Technology for Reading and Writing on Apple devices

To enable students to gain access to information, some need a little help to read and write. The iPad has a selection of tools to help make accessing information more of a level playing field.

Text to Speech

By highlighting text, the student has the option to have the text read to them and the words highlighted as it goes.  Very good for children to check that what they have written sounds like "book language". Can help a student hear their story so far and expand on their writing. Gives students access to information on the web that may be difficult for them to read, but they can understand when it is read to them. It is important the check the speed at which the text is being read to them, so they are given a chance to hear and process the information.

iOS Devices


First go to Settings, then General and then Accessibility


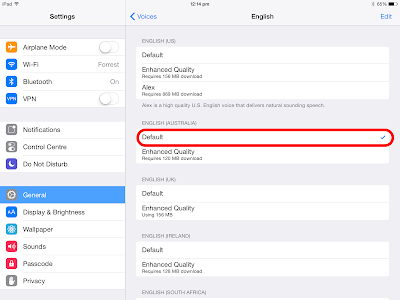
Select Speech


You are now ready to use this in web browsers, documents and anywhere else you are able to highlight text.


OSX Devices


Go to System Preferences and select Dictation and Speech


Speech to Text

By activating Siri, you are able to speak into the microphone and dictate text which is then typewritten for you. This can be used in the iWorks Suite of apps, some third party apps and web browsers. Sometimes the use of a set of earphones with a microphone (like the ones used for an iPhone) may improve accuracy.

iOS Devices


Go to Settings, then General and then Siri

Enable Siri, Choose a Language and Voice Gender

It has the New Zealand option now. Siri improves voice recognition the more you use it.


This will come up the first time you use Siri to dictate a search in a web browser in iOS


OSX Devices


Again, go through Systems Preferences

There are many other assistive options for Apple devices to assist with vision, hearing and physical and motor skills and learning.


Monday 6 July 2015

A Web Whiteboard

Click here for more information


I have found this to be a very useful web tool which is not platform dependent.

This online whiteboard is another alternative to creating an "Explain Everything" experience on the laptop/desktops.

You are able to share a link from a whiteboard you are working on, to invite others to collaborate using their own devices simultaneously.


You can bring in JPEG files and annotate over the top of this to explain a concept such as part/whole addition.


You are then able to either download the finished image.


or 


Use Quicktime,  to make a screen recording of the explanation which will also record the oral explanation. Be sure, if you are using images to help with the explanation, to have all necessary images pre-downloaded before you start the screen recording. 


Select the work area of the Web Whiteboard and your screen recording will start.

When you have finished you press, ⌘,⌃, esc (command, control, escape) and this will stop the recording and bring up the finished recording ready to be given a file name and saved.

These explanations can be filed in the student's Google Drive. From there, the students can share these if the movie is needed to make a collaborative presentation.